Imagine you go for a stroll in the neighborhood. Unfortunately, distractions begin to manifest. A slobbering pit bull gets loose from its barren yard and chases you into some murky woods. In the forest, you stumble upon a group of singing moonshine drinkers who insist that you share a story. Three days later, you crawl your bedraggled body home. The unplanned absence doesn’t sit well with the plants. The lack of water and nutrients kill half of your rooted friends.
Your neighbor reports having the same bad luck. Fortunately, he tells you, all his plants thrived while he was away.
“I give thanks to my precious hydroponic ebb and flow system,” he gloats.
You curse his good luck, knowing that if you had the same system, you could have stayed in the woods with the moonshiners for a good week.
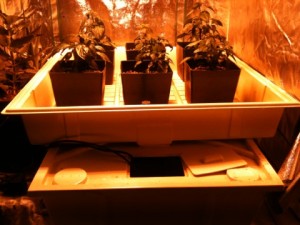
The ebb and flow system (incorporated with some hydro know how) is perhaps the easiest garden to walk away from when pressing matters arise. The system (AKA flood and drain) works by flooding your plants sitting in a grow tray (which sits above a reservoir) with a nutrient solution for a specified period of time (usually for fifteen minutes every four hours when the lights are on). A submersible pump is activated by a timer that cues the pump to fill the tray. An installed overflow riser keeps the water from spilling over the side. Once the timer stops the pump, the solution then returns to the reservoir enabling fresh oxygen to return to the roots for optimal growth.
Ideally, the ebb and flow grower can change out the reservoir once a week with fresh nutrients and water, thus leaving more time for irresponsible behavior.

Here are the items you need if you choose this path:
(Note: Ebb and Flows come in all sizes. For this piece, I’m doing a system that will support nine heavy feeding plants).
- 3×3 Grow Tray
- 40 gallon reservoir
- A 185 GPH (Gallon Per Hour) submersible pump
- Air stone and a single valve air pump to keep nutrients aerated
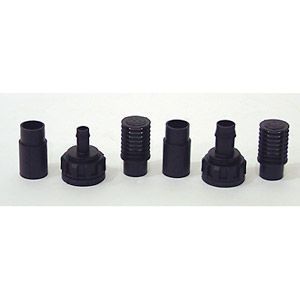
- Ebb and flow drain kit (consisting of one 3/4″ outlet, a 1/2″ outlet, two risers, and two screens)

- 1/2 ” tubing to connect to the pump and into the 1/2″ outlet
- 1 1/4″ drill bit and drill for the outlet holes
- Lighting; See our lighting section to fine tune what you need in this situation
- Hydroponic specific nutrients like Canna, Botanicare, Fox Farm, etc.
- Hydroton (see our Hydroponic Chronicles Part One for discussion on its necessity)
- Pin Timer for the pump
- Quality pots like the 2 gallon Perfect Pot for both its square shaped compatibility and sturdiness
- Go to our Cut Above section to start the plants from seed or cloning
Once your seedlings develop a strong root system, you can transport the little ones to the Perfect Pot anchored in the hydroton. Drill your holes with the 1 1/4″ drill bit in both the reservoir and the grow tray. Align the tray holes over the reservoir holes (see above picture for how it should look). Install your outlets by aligning the grommet part of the outlet over the tray hole. Then, you screw the bottom part of the outlet up through the reservoir hole to hook up with the tray.
Hook your sump pump up to the 1/2″ tubing and hook the tubing into the 1/2″ outlet. Screw in a screen to the 1/2″ outlet up top (this prevents unwanted sediment from going into the reservoir). On the 3/4″ outlet side, hook up the two risers and then the final screen. The 3/4″ outlet allows water to return to the reservoir once it reaches the riser height during the flood stage. The reason the outlet is smaller for the pump side is to ensure that water can escape quickly on the 3/4″ outlet side.
Now add your plants to the tray and put your nutrients in the reservoir (make sure to follow instructions for seedling feeding ratios). Hook up your timers for both the pump and the lights.
Do a victory lap followed by a week of neglecting your plants.

Leave a Reply