-Mike Weeks-
It’s that time of year again when activities in the garden have come to a near standstill and the holiday hustle and bustle is over. Any gardener knows there’s always something to do with the garden whether that’s taking inventory on your seed stock, planning and designing new beds, or even sharpening your tools. But, those unusually warm winter days in between the cold ones like we recently had are perfect for tackling projects that will give you a leg up on spring gardening. We’re talking about building your soil!
Every great garden begins with great soil and the right addition to any garden, big or small, is compost. There are many methods for improving or maintaining soil health (which you can read more about in some of our other blog posts) but a tried and true way is through adding organic matter – and lots and lots of it. When you prioritize soil health you are increasing the amount of biological activity in the soil which in turn helps convert nutrients for plants, increases the water-holding capacity of the soil, and improves the soils’ structure. All of that will help your plants be healthy so they can better resist disease and pest outbreaks and you can have an abundant harvest.
Through a recent farm job, I was introduced to a very simple yet effective composting system that anyone with the right materials can build, called a bioreactor. Below, I will provide an overview of the steps for building a Johnson-Su bioreactor system for your home garden.
Why the Johnson-Su bioreactor? What’s different about this method from any other home composting system is that it is designed to allow the compost to break down (degrade) fully to produce mature compost, quickly. When built properly, the Johnson-Su bioreactor does not require turning like other systems and, because it breaks down aerobically, it doesn’t smell or attract pesky flies with other systems. The other big difference is in the final product – most home compost systems produce a mulch-like finished material whereas finished compost coming out of the bioreactor has a more moist, clay-like consistency and is great when used as a soil amendment or as an extract for seed germination.
Needed Materials (under $50!)
- Landscape fabric
- One pallet
- Wire re-mesh (6” x 6” x 10 gauge wire)
- Four 10’ lengths of perforated bell end 4” piping
- PVC glue
- Tie wire
- 13’ of ½’’ landscape water hose
Tools for the job
- Small bolt cutters or heavy pliers for cutting the wire re-mesh
- Linesman’s pliers to cut and tie the tie wire for assembling the cage
- Circular saw
- Jigsaw for cutting the holes in the pallet
- Scissors for cutting the landscape cloth
- Tape measure
- Pen or pencil to mark places that will be cut
Building the Reactor

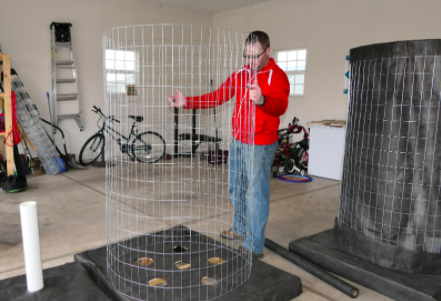
With scissors, cut a piece of landscaping fabric to 13’ in length and 6’ in height (if using the DeWit barrier, you’ll need to connect two 3’ wide pieces). Using bolt cutters or pliers, cut the re-mesh to 12’6” in length and 5’ in height. Temporarily tie the wire cage ends together and stand the cage up like a cylinder. Position the 13’ x 6’ piece of landscaping fabric along the interior of the re-mesh cage and sew it into place using a long piece of tie wire with a sharpened point (cut at an angle using the pliers). Pierce the landscaping cloth very close to the top of the re-mesh cage, and sew the tie wire through the cloth and the re-mesh wire in an alternating pattern (in and out, close to the top of the wire cage) to the end of the 12’6” re-mesh. Repeat this step for the bottom of the cage and fabric. After you have sewn the fabric to the wire mesh cage and before you get ready to fill the reactor, securely tie the ends of the re-mesh together at the 6” intervals using tie wire and pliers. Be sure to place a secure tie every 6”. Otherwise, the pressure that builds up when you fill the bioreactor can push this joint apart.
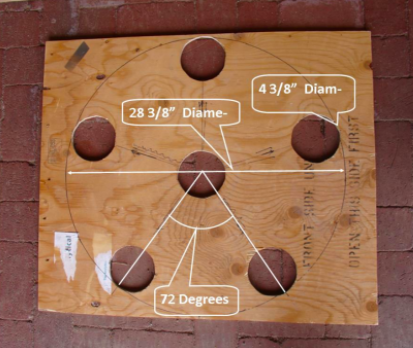
The pallet serves as the base for the Johnson-Su bioreactor, and it supports both the remesh/landscape cloth cylinder and the septic system drain field pipes. To allow the pallet to hold the pipes in place, you’ll use a jigsaw to cut six 4 ⅜” holes.

The pipes are only in place temporarily and are a form to ensure that six columns are formed to allow air flow up through the bioreactor. These pipes should be removed approximately 24 hours after finishing the filling of the bioreactor.
Using a circular saw, cut the 10’ pipes so that you have four 4’ pieces of pipe left with bell ends. With pvc glue, glue two of these 4’ pipes together, and then cut them to 6’ so that you have six 6’ pipes. Place the 6’ septic system drain field pipes into the holes in the bottom pallet. If you are using a metal jig, secure the pipes to the metal jig with tie wire. If you’re not using a rebar jig, simply grab a helping hand to hold the pipes in place. If you can’t find a helping hand, the material of the bioreactor will hold the pipes in place until it is full. After you fill the bioreactor, you can remove the pipes after one day and reuse them in another bioreactor. Fungal hyphae in the bioreactor will hold open the channels where the pipes were, leaving open columns that let air flow from the bottom of the pallet up through the compost. Space for air flow is necessary in creating an aerobic compost pile, if the compost turns anaerobic, you may be adding bad bacteria onto your fields. If the compost pile turns anaerobic, there are ways to fix this problem so that you are fostering the growth of beneficial microbes and bacteria. Now that the bioreactor is built it is ready for filling. Filling a bioreactor can take more time than you might expect because there are many steps in preparing each shovel full of material, so unless you’re filling quite energetic, you can fill the bioreactor on a different day.
Filling the Reactor
The materials you use can be flexible, what is important is that the materials you’re using are dried and clean (meaning no trash or plastics in the mix) and preferably shredded. You can use kitchen scraps for this, but if they are fresh, meaning there is still water being retained in the material, I would opt to not use this without thoroughly drying it. If you use kitchen scrap material and it has not been thoroughly dried then this can attract pests and create anaerobic conditions.
So, a good place to start is ⅓ animal manure, ⅓ shredded woodchips, and ⅓ leaves/yard waste. Shredding these materials increases the surface area which will ensure a quicker degradation by the microbes. It is recommended you fill the bioreactor in one go because you will be monitoring internal temperatures for the next four to five days to ensure an adequate breakdown of materials. Just as with the kitchen scraps, these materials need to be dry.

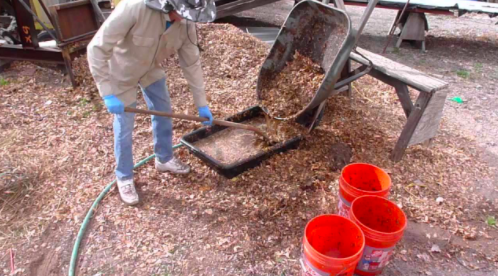
Before beginning to fill the bioreactor, it is crucial that you completely wet the feed materials. Immerse the feed materials in a water bath, using one of the inexpensive plastic trays used for mixing small batches of concrete or mortar. Fill the tray with water and place 4-5 pitchforks of material into it. Then use a pitchfork to press the materials below the surface of the water and/or spray the material to ensure sufficient water penetration. It only takes about 60 seconds of immersion to wet the materials properly. Once the feed materials are thoroughly wet, use a pitchfork to lift them into a wheelbarrow that is braced into a tilted position so that water can drain off of the feed material and back into the water-bath tray. This uses the water efficiently.
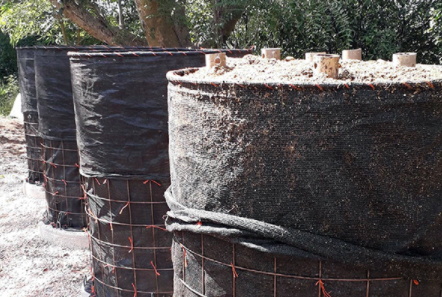
Fill the 5 gallon buckets with wetted material and dump those buckets into the reactor, do not press down on the materials, let the weight of the material settle itself. We want to create aerobic conditions so our compost is full of good bacteria and fungal life.
Once you have built the pile, you may want to install an irrigation system that will water the pile for one minute each day or water it for one minute a day every day (but not on or after rain events). It is very important to keep the pile adequately damp (greater than 70% moisture content). One way you can tell if the pile is adequately damp is by grabbing a handful and squeezing, you should be able to produce a drop or two with a strong grip. If much more water drips out, it is too wet and will need to skip a day of watering. Alternatively, if you have a soil moisture gauge, you can test different parts of the pile to make sure there is adequate water. In addition, you’ll want to keep the pile covered, use the second 6’ x 6’ piece of landscaping fabric to cover the top of the bioreactor. This will help to keep the compost moist. To keep the landscaping fabric from blowing away, tuck the corners into re-mesh of the cage.
For the first five days of filling the bioreactor, you’ll want to measure the temperature of the pile, the temperature should be in the range of 140 to 165 degrees fahrenheit.
Once the pile temperature drops below 80 °F, worms can be added to augment the composting process. Feed materials should be composted in the bioreactor for at least nine months, and a one-year composting period is recommended since microbial populations and species richness increase significantly at about the one year threshold.

Using the Compost
The finished product is ready for use in 9-12 months. As mentioned above, it can be worked into the native soil (or potting soil) or it can be made into an extract and applied as a spray. Lastly, you can inoculate seeds by creating a slurry. See recipe on page 18 of this pdf.
Resources

Cary Mandeville says
We built a bioreactor here in Atlanta Georgia… Put rubber caps on the six pipes during filling to keep debris from going down worked quite well they’re called 4-in Fernco rubber caps.. of course typing the tops with duct tape would work as well
Boyd Myers says
Used some old hose, slit down the middle to cover the cut wire projection from the screen at both top and bottom, to prevent tearing the cloth.
ashley says
Nice hack, Boyd. Thanks for sharing it!
BOYD MYERS says
Using ground leave as the primary component, wet in trough and loaded as in the demo, over 3 days, added some seed compost, some greens and ground alfalfa between every foot layer…pulled pipes on day 5-6…never got thermophilic response that I am accustomed to seeing peak over the first 5-6 days, then decline over 7-10days.
Pile remains moist, no smell….HELP…any suggestions…not sure while no thermolphilic response?????
ashley says
Hmmmm. To my best knowledge, I don’t think the bioreactor pile will heat up as much as it would with a regular compost pile simply because oxygen is constantly supplied to the middle of the pile. Just ensure that proper moisture content is maintained and give it a little more time to begin breaking down. Hope the reaction starts soon. – Mike at FSG
Soilfoodwebstudent says
Thanks, helpful article!
Chris Nelson says
Hey, I’m thinking that you do want a hot period to start, not only to inactivate a lot of the seeds, but just to get a better ultimate breakdown within a year, so the process will nest well into your seasonal routines. Last year I had the same cool start that Boyd observed, and had used similar ingredients. After nine months, when it came time to plant out my new trees, I pulled our bioreactor apart and found a pretty good moisture level but not an expected extent of breakdown. A third was fine compost that passed a quarter inch screen, and the other 2 thirds material I will just use as mulch.
Last week I picked up horse stall waste that is roughly half manure, the rest being straw, shavings and wood chips. I mixed this with garden waste in equal 6-inch layers. (My garden waste is a little on the woody side.) The manure is the main difference. I think it kickstarted the process this year. I saw temps over 130 within 2 days and they have been 140 to 160 degrees F everywhere in the pile on days 4 and 5. With this start, I hope to get a much greater fraction of true compost. One other difference: I kept the top end of my vent pipes capped until day 5.
Maybe if you don’t use manure, at least find a rich source of microbes that you mix in very well, to be sure you get off to a good start.
fifthseason says
That’s great information, Chris! Thanks for sharing!
Judy says
Can you store what you have left for another time? and if so, how do you store it? Also, are the worms alive in the compost, what happens to the worms?
brian says
Thanks for your question. You can absolutely store what is left over for another time if that’s what you’d like to do. If you prefer to use the whole batch…just about any tree or shrub will benefit from a couple of inches of compost added to the top of the soil. Just be sure to keep it pulled back from the trunk. As for the worms, they should be happy in the composter and will move to where the temperatures are best for them. When it comes time to use the finished product, you can either leave the worms in what you spread to disperse them. Or, you can keep some of them aside for the next batch. We’d recommend a bit of both. Good luck!
Jen says
Hey you all. I am just about to fill a bioreactor myself, but I only have fresh wood chips and leaves. Meaning they are not dried. Do you have a suggestion of what will happen if I put them into the container as they are (but soaking them before) together with 1/5th of dried leaves from a nearby forest?
wickyarnold says
I value the blog article. Really Great.
jack says
leaves need to be shredded first.
particle size for JS compost is important