Hi all! Sometimes we get questions from folks that want to build raised beds, but aren’t sure how to do so in a sloping space. It is important that your beds be close to level so that water is evenly distributed. Your plants will like that part and it does look better this way too!
So, we rolled up our sleeves and took a run at the project. Here’s how we did it and we’re pleased with the results. Hopefully you’ll find this information helpful and if you’ve got tips on how we could have done it better…bring them on in the comments section below! One of the best parts of gardening is learning from others!
Prework
- Select your Site: Full sun is great for most raised beds. But, if you’ve only got partial sun available…that works too!
- Determine how big your box(es) will be. Rule of thumb is that they can be as long as you want but no more than 4 ft in width. This will allow most people to work in the full bed without stepping inside the bed and compacting the soil.
- Determine how tall you want your raised beds to be. 8-12” deep is great in most cases.
- Determine what you will build your raised bed out of. Most people use lumber and we chose ground-contact rated, pressure-treated wood. There is some controversy about using pressure-treated wood for edible gardens. According to the Oregon State University Extension Office the impact of today’s pressure-treated wood in an edible garden is minimal and safe. See article here. However, if you prefer to avoid the issue all together, untreated pine and cedar are both great options too.
- Gather your materials and tools and let’s get started!

Step 1: Build Your Boxes
This is best to do near where you ultimately want them to live. Once built and placed, it’s a good idea to mark the space with spray paint as a reference point.
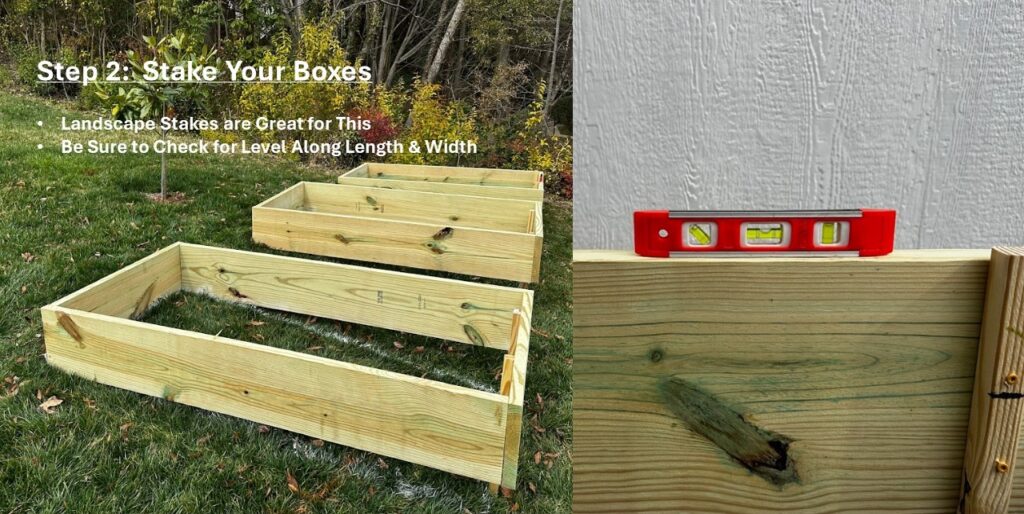
 Step 2: Stake Your Boxes
Simple landscape stakes are strong enough to hold your top box in place for these purposes. Make sure that you’ve got everything level and that your boxes are still in the right place.
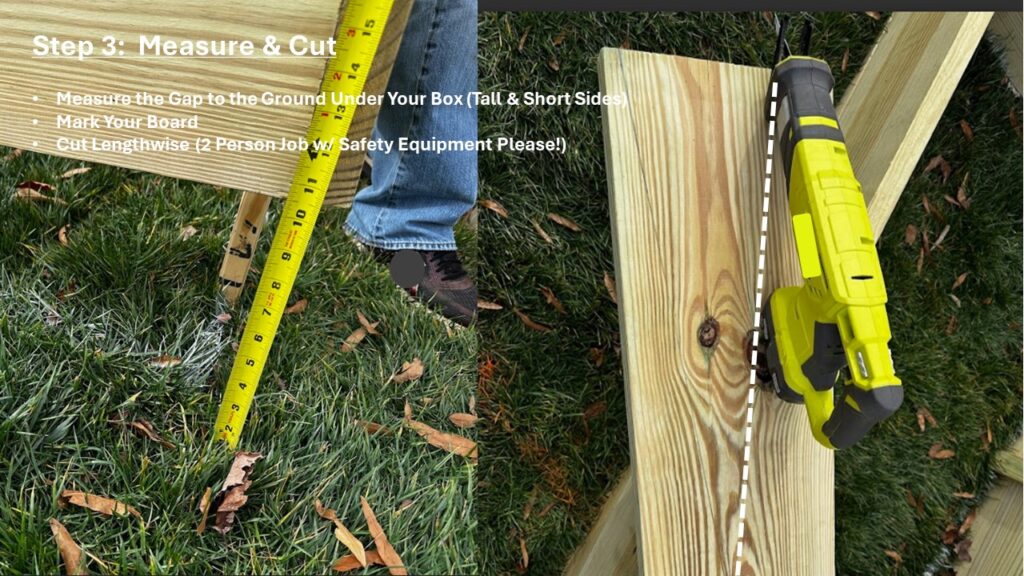
 Step 3: Measure & Cut
Measure from the bottom of your staked box to the ground. Then measure the length to where your top box touches the ground. Mark an additional board with these measurements and then cut your board. Don’t worry too much if you’re off a bit with your line or cut. You can always dig down a bit or pack some extra soil into the gaps to make it work. This isn’t fine cabinetry afterall! Please, please wear safety equipment and work with someone else for this step and take your time.

Step 4: Insert Boards & Brace
Insert the boards your just cut under your staked top box. Remove the stakes and if you’re still level and in the right position, secure the corners and boards with braces. We simply used scraps of wood and deck screws for this job. If you’re off a bit on level or location, it’s best to make changes before locking everything into place!

Step 5: Line Your Box
Line the bottom of your box with a couple of layers of cardboard boxes. This will prevent grass or anything else from growing up through your raised bed. Also, the cardboard will decompose quickly and worms will be able to access your bed. Some people use weed barriers underneath their raised beds. While this isn’t wrong…we like to make it as easy as possible for worms to find us!

Step 6: Fill your boxes!
Fill your boxes with quality organic soil. We chose a 50/50 mix of Ocean Forest and Happy Frog from FoxFarm as they are best sellers at FSG and are loaded with nutrients, beneficial microbes and are pH balanced. Other options include making your own soil blend (we can help with recommendations) or another organic soil blend (we can help here too!)
Protip: Especially on the deep end of your box. Feel free to fill the bottom portion with logs, twigs, yard debris, etc…Eventually these will compost and as long as your top level box has the soil it needs (8-12”) you’re good to go! Best to avoid using black walnut as it has chemicals that can suppress the growth of certain crops.
Be sure to leave 2-3” headspace at the top of your boxes. This will come in handy later in the season &/or next year when you add fresh compost to help restore nutrients.
After the Project
Eventually, we’ll need to build some type of barrier around the garden to keep squirrels, rabbits and gophers at bay. That’s a project for another day. In a couple of weeks we will be planting and tending a new Organic Garden But, before then, be sure to take the opportunity for some humble bragging with your friends and neighbors. Maybe you can help them to build boxes too!
Happy Organic Gardening!
-FSG

Tracy Ratzlaff says
Thank you for the article. I like the simple and great information. The step by step is good for me. I’ll have to get Rhys to go with me to your store.
brian says
Glad you found it useful. Bring all your friends to FSG!!! Helping folks be successful with organic gardening is our favorite thing to do!