Seed Starting

The lengthening days of late winter anticipate warmer temperatures soon to come. Springtime is just around the corner and you can get a significant head start on the growing season by starting seeds early. Whether you have a greenhouse or are limited to some extra counter or cabinet space, you can successfully start seeds for transplant weeks or even months before you could sow them outdoors. The process is both highly economical compared to buying fully grown starts and a rewarding part of the plant cycle.
A seed is essentially a tiny shell stuffed with an embryo and sufficient nutrients to sprout and feed the first set of leaves called cotyledons, or ‘seed leaves’. Temperature, moisture, humidity and time are key factors to coaxing the dormant embryo to initiate germination; adjusting these factors towards optimal conditions will help you achieve high germination rates and strong seedling growth.
Temperature levels are very important to seed germination. Given different types of seeds’ temperature sensitivity for germination, the plant embryo may never emerge from its coating outside of its ideal temperature range. Plants that enjoy the early spring or fall growing seasons like lettuces, greens and broccoli can germinate at temperatures in the range of 40-70 degrees Fahrenheit. Plants that enjoy the heat of the summer months such as tomatoes, peppers and squash prefer much warmer conditions in the 70-85F range – within this ideal range, the warmer the seed is the faster your seedling will emerge. Super Sprouter Seedling Heat Mats are a great way to warm the growing media to your ideal temperature range. They are electrically heated mats that, when placed under seed trays, heat the ambient temperature around 10-20F. Thermostats for the Super Sprouter are also available to more precisely dial in the optimal germination temperatures for your seeds.

For faster germination, try a seed soak of Neptune’s Seaweed or Canna Start. The high levels of micronutrients present in these products encourage quicker germination and a stronger, healthier seedling. Feeding your small seedlings a light dose of micronutrients also helps them transition to their vegetative stage as strong and healthily as possible.
There is a variety of different growing media to plant your seeds into. The right choice mainly comes down to personal preference based on what you may or may not have had success with in the past. Below is a detailed summation of several different options for growing media:
Soil – The most natural of the media. When starting seeds in soil you want to make sure you choose an inert medium like Sunshine or ProMix, or a lightweight, lightly fertilized soil like Fox Farm Light Warrior or McEnroe Lite to maximize germination rates; the former are peat based sterile mixes, the latter are fertilized soils derived from peat and other natural sources such as compost and rock powders. You can add a granular mycorrhizae (Rooters, Plant Success; beneficial fungi), granular kelp (Nature’s Nog, Algamin, Maxicrop; kelp-based micronutrients and hormones) or compost to enhance your soil. The soil should be slightly damp (hint: warm water helps water permeate the seed coat) and lightly compacted- either by dropping trays from a small height or lightly pressing down soil- to collapse any air spaces that could desiccate the emergent root. The depth of your seed in the soil should equal one to two times the width of the seed (ie. the smaller the seed, the thinner the soil covering;the bigger the seed the deeper it’s buried.)
Starter Plugs – starter plugs are an inert, spongy textured pocket made of composted pine pulp. Starter plugs can be purchased in 50, 20 and 10 count bags. They are formed with a convenient hole in their tops that can be opened by squeezing the sides of the plug. You simply drop your seeds down the hole and tear off a small piece from the top and gently cover the hole, preventing the seed from drying out or possibly washing away. Note that Starter Plugs are difficult to hydrate once they dry out so you’ll want to monitor their moisture closely.
Rockwool – rockwool is made of fibers of basalt and chalk that were heated to around 2,000F and then spun in a machine in a similar fashionto cotton candy. The two ideal rockwool products for seed germination are the AOK plugs and the 45pk 1.5 inch cubes. Rockwool boasts a high water and air holding capacity. Rockwools main draw back is that its starting a pH is 7.8, too high for most plants. Luckily, this is easily remedied by soaking in a 5.5 pH solution for 30 minutes to neutralize the pH. This solution is easily made or purchased at Fifth Season Gardening. Before sowing seeds, just soak and then shake out or pinch excess water from the media.

Jiffy Pellets – jiffy pellets are compacted spaghnum peat moss pucks held together with biodegradable netting. Jiffy pellets should be prepared by soaking with warm water overnight (hint: you can add some Neptune’s Seaweed, Technaflora Thrive Alive or Canna Start to the water to supply some micronutrients for the seedling). Similarly to rockwool, Jiffy Pellets retain a lot of moisture so you will want to squeeze the excess moisture out of the hydrated pellet before planting your seeds.
Moisture levels are critical to success; if your medium is too water-logged you risk rotting your seed, perhaps before it can even germinate. You can check by squeezing your media; if it drips profusely or streams water that is a good indicator that you are over-saturating your medium. If your medium yields no moisture when compressed, it is likely too dry and the seed may not germinate properly or dry out and die when it does. With experience, you will be able to achieve the middle moisture level that is ideal for proper germination. Placing a Mondi Humidome on your flat tray can help maintain ideal moisture levels while also stabilizing temperature.
At some point – in either a couple of days or several weeks, depending on your seeds –you will start to see the emergence of your seedlings. At this point the humidome should be removed. High humidity and moisture during the fragile seedling phase could cause your seedling to ‘dampen off’ (the result of a fungal infection that causes the seedling to rot at the stem where it meets the growing media). Having a drier environment at this stage will minimize fungal infections. The addition of compost or a heavily diluted compost tea can help the seedling fight soil-borne fungi and other pathogen borne diseases –these products contain a microbiotic community that can assist the seedling in survival by maintaining a balanced soil ecology. It’s also important to water your seedlings from the bottom up: Fill the tray with water and let the media soak the solution up to the roots. Watering from the bottom of the tray can reduce excessive moisture on the surface near the stems and leaves.
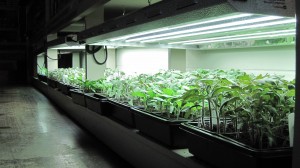
During germination the plant doesn’t require light; however, once the seedling and cotyledons emerge, the seedling must begin photosynthesizing to produce enough energy to grow and survive. You can place your seedlings in a windowsill (making sure it’s not too cold), but bear in mind that low light levels could make your seedlings ‘leggy’ (elongated stems) and very weak as they stretch searching for more light. Ideally, you want to place your seedlings under some type of fluorescent fixture such as the Sunblaze. Fluorescent lighting is an ideal, low stress, low heat way to provide lighting to your plants. As a general rule, your fluorescent light should be four to six inches from your plants but you can modulate further using the hand test: Place your hand at plant level;if the heat is too hot for your hand, it’s too hot for your plants. Elevate or lower the light according to your hand’s comfort level and keep a close eye on your seedlings. You may have to adjust the level of the lighting regularly as your plant grows.
Equipped with this primer on seed starting, you can expect a successful early crop of vegetables this Spring and Summer. Happy Gardening!
By Anna Haupt

Johann says
Spring seed starting gets me to do double somersaults. Triple if I’ve been drinking.
Scooby says
Hi great article
Q I HAVE A HEATED VITOPOD PROPERGATOR
AFTER A 10 DAY PERIOD SOME SEEDS HAVE STARTED TO SPROUT BUT NOT ALL
WHAT SHOULD I DO
KIND REGARDS
SCOOBY
ashley says
Some seeds do take longer (10 days to 14 days is typical) to germinate, so I’d wait and not take any action yet. If after 2-2.5 weeks some have not sprouted, then they are probably not going to sprout (especially if others of the same variety have already done so). At that point, all you can do is to try a new batch of seeds. Germination rates can vary greatly depending on the quality and age of the seeds you have. If most of your seeds are germinating, it sounds like the problem of non-germination might be with the few seeds that did not germinate. If most seeds are not germinating, the problem might be with your process (too cold or warm, not enough moisture, light, etc.)