-Kristin Weeks-
It wasn’t long after first learning about kokedama that I decided to try my hand at it, and that meant reading as much as I possibly could about its history and all the best practices that the internet had to offer about how to make these adorable, container-less string gardens. A lovely woman then came into the store looking for a new plant for her bathroom and we went on a hunt for the perfect pot to go with it. After exhausting our options (since surface space was a limiting factor), I suggested she ditch the pot idea and instead do it kokedama-style. I began outlining the steps but by the look on her face it must have sounded like (too much) work. I was starting to lose her.
“Some call it lazy-person’s bonsai,” I said (with no intention of calling her lazy, of course!)
“Ooh, you got me there!” We added a few materials to her cart (at no more cost than a pot would have been) and off she went ready to create her first kokedama.
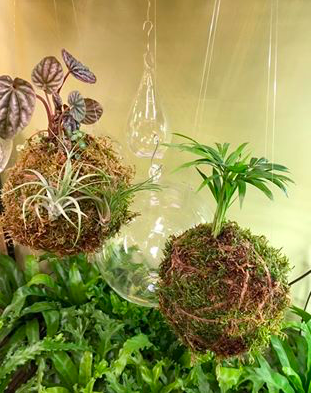
Kokedama, which translates in Japanese to “moss ball,” is a way of arranging plants where the root ball of the plant is encased in a ball of soil, which is then wrapped in moss and suspended in the air (or sometimes displayed in a dish). Kokedama originated from a century’s-old style of bonsai called Nearai by which root-bound plants would be removed from their containers – a reflection of the Wabi-sabi tradition. These spherical, floating creations have gained in popularity in recent years for their unique, space-saving, and downright whimsical appeal.
Here’s how to make your own!
Start by collecting your materials. You’ll need:

- Peat Moss
- Potting Soil – I used Black Gold Organic Potting Soil
- Bonsai Soil – I used Tiny Roots All-purpose. Alternatively, horticultural (red) clay would also be suitable
- Preserved Moss or Sphagnum Moss
- Muslin Hop Straining Bag (optional)
- Plants – best choices include ferns, philodendrons, palms, anthurium, peace lily, creeping fig. Avoid flowering plants and succulents. Start with 2”-4” plants (pot size).
- Twine or Waxed String – I used waxed string as twine can deteriorate over time. Fishing line also works.
- Large mixing bowl
- Scissors
- Measuring cup
- Watering Can
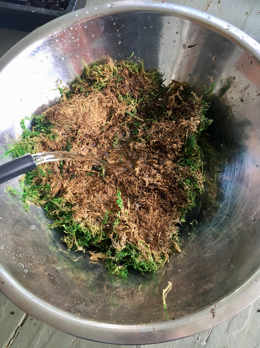
- Prepare Your Soil – Mix 2 parts potting soil, 1 part peat moss, and 1 part bonsai soil (or clay), in a large bowl. Add enough water to where it begins to hold together but isn’t soupy. *The clay will help with binding, however, too much clay will dry it out.

- Next, take a large handful of the soil mixture and shape it into a ball. Squeeze out any excess water. The balls should be firm enough to toss gently in the air without crumbling.

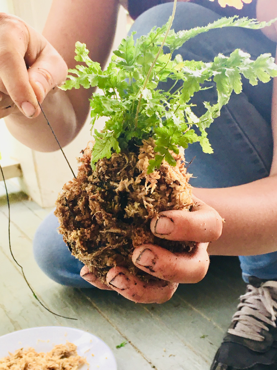
- Remove your plant from its container, and, being as gentle as possible, remove as much dirt as you can from the roots. Gently crack open the soil ball and place roots inside. Take some more soil mix if needed to close and shape your ball again until it is nice and round.

- Place plant in between the halves and then close back up, shaping back into a ball around the plant.

- This step is optional – I’ve made kokedama both with and without wrapping the ball with muslin (or cheesecloth) before adding the outer moss layer, both successfully. Traditionally no muslin bag would have been used.

- Next submerge the sheet moss or sphagnum moss (whichever you plan to wrap the soil ball with) in water and let sit for a few minutes, then wring out thoroughly. This makes working with the moss much easier. Once moistened, lay the moss out on a clean surface (green facing down). Be sure pieces are patched together if not one solid piece.

- Wrap your moss so that it covers the entire ball; if it’s moist it will stick well enough for the next step. Then, taking your string or twine, wrap your ball entirely so that the moss will stay in place. Zig-zag all around many times until it feels tight then tie the string off with the tail of the starting piece. Last, cut 2 or 3 pieces of string and attach them on each side to create your hanger.

- You’re done! Now hang in the perfect place (but make sure it is accessible for easy-watering). Make a bunch at a time and create a fabulous string garden!

Care
- Watering – the easiest way to water your kokedama is to completely submerge it in a bucket of water (plant side up) for 10 minutes. Remove and gently squeeze out any excess water. Misting is fine for foliage but a full submersion is best for complete watering. Tropicals and ferns will appreciate high humidity and regular watering whereas other plants, like anthurium, pothos, and hoya, for example, can get a bit drier between watering. As a general rule, 1x/week is a good place to start.
- Fertilizing – To feed your kokedama, use a liquid plant food and use it according to the directions, but using 1/2 of the recommended dosage. I find the best food is the Neptune’s Harvest Seaweed Plant Food. You simply mix this in your bucket when you are doing your regular watering, or you can mix it up and put it in a spray bottle and spray the foliage from time to time. Feeding will give your plant that extra little boost!
Make a bunch at a time and create a fabulous string garden! Mother’s Day is coming up – try your hand at this fun DIY project for a fun living gift!

Marlene says
I’m trying to make a kokadama. I’ve done 7 to 3 ratio of bonsai soil and sphagnum moss and water and it just keeps falling apart doesn’t want to stick together. What am I doing wrong please.
ashley says
The ball has to be wrapped fairly well in a web of string to hold the ball together until roots can grow into a web that will help hold the ball together. You definitely want to cover the outside of the root and soil ball with moss that contains the dirt inside, and then web that with string to hold the whole mass together. I’d look at some online videos to see some examples of how to do this, if you are having trouble. Good luck!
Mary Ann says
Please could you tell me what weight fishing line? The one I bought was impossible to tie…I must have bought for huge fish 🙂
Mandy says
I was a proper lazy kokedama maker, I used what I had lying around – I didn’t have bonsai soil so used standard potting compost and added slow release fertilizer and some hydroponic clay balls. I held it all together in an old pair of tights and wrapped it in moss from my local wood. The plant is a fern, has been going 6 months now and is the healthiest looking houseplant I own!
Stephanie O'Sullivan says
After around six years I’ve found the one site that is simple and complete in its instructions of Staghorn Fern care, Yay! Gloria will thank you too, she’s my #1 Staghorn, Ginger is #2 and I will hangs her next as described, as my office space is limited but I won’t sacrifice my plants to another location! I have struggled with their care for years, not knowing I was supposed to fertilize them,,,,, my bad.