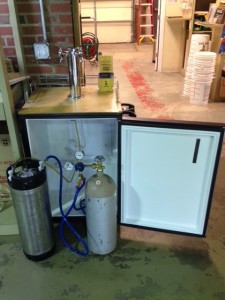
The vast majority of home brewers bottle their fermented product for simplicity’s sake, for aging or for other artisanal considerations. While bottle conditioning beer is effective and doesn’t require much infrastructure, most home brewers eventually aspire to kegging their beer too. Once the set-up is in place, kegging offers numerous advantages over bottle-conditioning: it allows the brewer to control and modulate carbonation much more accurately and deliberately; it mitigates oxidation and eliminates light exposure; it saves time and is more sustainable than buying bottles; and of course, there are few presentations more attractive than a home draught system. An expert brewer can even use a keg with a counter pressure filling system to bottle beer which offers a host of benefits, though this is beyond the scope of this article.
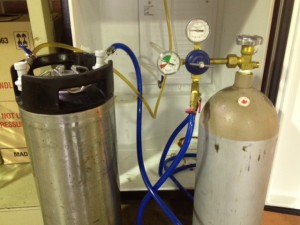
A complete set-up consists of a keg, a CO2 regulator, a CO2 tank, keg tubing and various connectors (pin style or Ball lock connectors, we carry both types) and clamps, all of which is available in the Kegging Equipment section on our website and at all Fifth Season Gardening Co. locations. By far the most popular size kegs are the 5 gallon Cornelius kegs which are still readily available as the restaurant industry continues to phase them out in favor of more efficient soda carbonation systems.

Kegging is performed following the completion of at least primary, and likely secondary fermentation. When connecting Ball or pin lock attachments it is advisable to administer keg lube ensuring easy disassembly when your friends have finished the last of your beer. As in all brewing procedures, cleaning and sterilization is paramount! Running Beer Line Cleaner (BLC) through all the liquid lines is recommended. BLC can be forced through the lines from the keg with pressure from the CO2 tank and then flushed with clean water. This is a good time to check for any leaks between the CO2 tank and the Keg giving each connection point special attention. This is easily accomplished by coating all valves, hose fittings, and the lid with soapy water- bubbles will form at the site of any leaks. Once this step is complete, its time to prepare the keg for its not-so-sudsy contents!
One of the aforementioned benefits of kegging is the reduction of oxidation. You can guarantee an O2 free environment by filling the keg with water, then pushing it out with CO2. The cold CO2 gas will sit in even an opened keg, so quickly and carefully siphon your beer into the CO2 gas-filled keg bottom and snap on the lid when the transfer is complete. The next step is to pressurize the keg using your CO2 tank. Push all remaining air out and replace it with CO2. Once this step is complete, you can technically store your brew for several months assuming that your keg holds the pressure.
The next step involves calculating the pressure needed to force carbonate the beer to the desired level. CO2 binds with cold liquid more easily than with warm liquid so start by allowing the keg ample time to equilibrate with the refrigerator temperature. You will then need to use a Carbonation Chart to determine the pressure required to carbonate your beer. The chart is an excellent carbonation resource, though desired carbonation will vary by beer style. The average psi for this stage for most beers is 12 psi. This would be a good time to re-check for leaks, just to be on the safe side. The waiting game follows until your keg reaches full carbonation, typically in a week or so. When desired carbonation is achieved, dial back the regulator to about 10 psi to maintain the co2 charger without over carbonating the beverage.
If you’ve ever been to a keg party or watched your bartender pour a beer, you know to tilt the glass and open the tap fully in a clean motion. Kegging is certainly more technical than bottle conditioning, but a beer protected from oxygen and sunlight, perfectly carbonated straight out of the tap is well worth the effort.
By Mike Weeks

Leave a Reply