-Trish Davis-
Growing mushrooms at home is easy-really! There are many ways to grow mushrooms at home, but two popular methods are the log method and the countertop method. The same cultivation guidelines and methods apply to many varieties of mushrooms, both culinary and medicinal, that are often found in the home garden or kitchen.
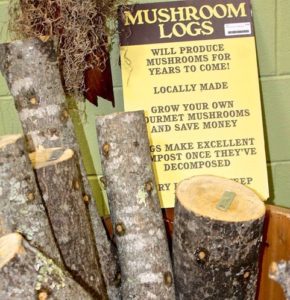
We’ll start off with Log method. Basically, wooden logs are drilled and then plugged with mushroom spawn, which fruit into mushrooms. We stock mushroom logs that are already inoculated with mushroom spawn at a number of Fifth Season locations, so call your local store to see what might be in stock.
Caring for a log is easy – keep it moist and out of direct sunlight. Mushroom logs do require some patience, however, as logs typically take about six-to-nine moths to fruit. On the other hand, a well-maintained log will fruit for several years, rewarding your investment.
For people who might want access to a wider variety of available mushrooms, or who simply want to prepare their own mushroom logs, the good news is that it is pretty easy to make your own!
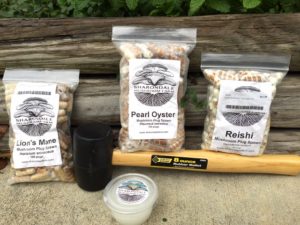
To grow mushrooms this way you will need: hardwood logs, a drill, a drill bit sized for your plug spawn, some tape, wooden plug spawn, a mallet, and wax.

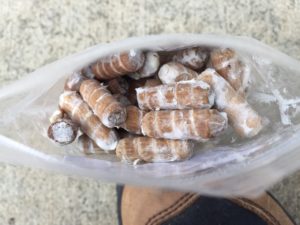
The log method uses hardwood logs and wooden plug spawn. Wooden plug spawn are small wood dowels, like those typically used in furniture building, that have been inoculated with mushroom spawn. The spawn begins to grow into and onto the plugs, covering them in a layer of whitish mycelia. Those plugs are pounded into a log, and the mycelia continue to grow into the log, eventually fruiting (sprouting delicious mushrooms).
Logs for mushroom growing are typically hardwood. Most mushrooms available in wooden plug form really like oak – but sugar maple and ironwood, and other hard woods, work as well. It is important to note that evergreens do not make good mushroom growing logs because they have antifungal properties. Although you can cut and use a log any time of year, it is best to cut in the fall/winter/spring, as the moisture content is most optimal. Use only freshly cut logs from living trees. Old wood and dead wood will be too dry, have other fungal competition, or insects.
Once you’ve selected a tree or branch that you plan to cut and use, you can decide how long you’d like your mushroom log to be. Some people like longer logs, and bury them partially, upright. This is the ‘totem’ method. You may prefer shorter lengths for ease of handling. Anywhere from two to five feet is common. The diameter can range from 3”up to 6” or so, but keep it manageable!

After cutting, make sure the bark is dry on your log before plugging, but don’t allow it to sit too long. A log may be useable for as much as a month or two, depending on how it was stored, but it will need rehydrating before use – soak it for several hours in a bucket of water and allow the bark to dry.
Use tape (blue painter’s tape works well) to mark the length of your plug on the drill bit. This will allow you to drill to the correct depth to accommodate the plug without leaving any empty space below the plug, or leaving the plug protruding from the log. Drill holes in your log in a diamond pattern – our plug spawn kits at Fifth Season have instructions that show how to place your holes. Basically, come in about 2” from the end of the log, drill a hole about every 6”-8”, all the way down the length of the log. Turn the log a couple of inches, and repeat, offsetting each new row of holes. Do this all the way around the log.
Use a rubber mallet to pound the plugs into the holes you’ve drilled, and cover the hole with a layer of wax. Fifth Season’s kits include wax that can be spread without heating. This makes the entire project much more family-friendly than if using hot melted wax. The wax keeps insects out and moisture in. It is important to complete the drilling, plugging, and waxing in one sitting. This helps keep competing fungi and insects at bay.

Place your log somewhere it can be seen, and easily watered. Logs must be kept moist – a good soak every couple of weeks is ideal, or water it thoroughly every few days. Bark should be allowed to dry – moldy bark indicates too much watering. You don’t want to miss those lovely mushrooms when they appear, either. There’s nothing sadder than finding lovely your shiitakes all eaten by critters before you got to them.
You can allow your log to fruit naturally- sending out small bunches of mushrooms periodically through its fruiting season (typically spring and fall) – or you can “force” fruit the log by submerging it in water for 24 hours, resulting in a larger flush of mushrooms at once. If you choose this method, allow your log to rest for a couple of months in between fruitings.
As with all crops, there are variables of climate and location that may impact your results.
Countertop Bag Method – this method allows ease of growing in the kitchen, a fast crop, but fewer fruiting cycles than a log. For this method you will simply need the bag kit and a tray to set in on.
Follow the directions on the particular bag kit you have. Fifth Season carries a variety of countertop kits, and oyster mushrooms are a popular choice. Generally, these kits require that you cut a slit in the bag (to allow your mushrooms a place to sprout out) and that you keep it moist.

The number of harvests you get will vary with the size and type of countertop kit, but at least 2-3 can be expected. The advantage to countertop kits is that they are easy to keep track of, easy to harvest (year ‘round!), and are ready to harvest in just a few weeks, rather than months.
Regardless of the method you choose, home-grown edible and medicinal mushrooms are an easy and wonderful addition to your family’s garden and diet!

Mel says
I started growing my own mushrooms a couple years ago and love it. It doesn’t always work out (which is why I keep reading tutorials!), but when I get a big crop, it is so rewarding! I think the hardest part is keeping the log damp, but not too damp.