 Cider has been gaining popularity in recent years and is experiencing a boom in artisan and craft production. This spike in attention has resulted in a concomitant rise in interest among home beverage makers. Home cider making is easy, fun, and produces delicious rewards. This refreshing beverage is great for those times when you want something light and crisp, with a touch of acidity balanced by sweetness. Cider is also great to have around when you know someone who has a gluten sensitivity or just doesn’t care for beer or wine.
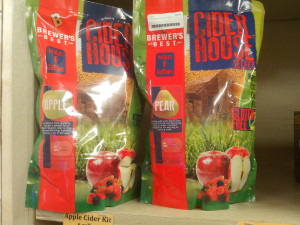
The Brewer’s Best line of kits recently released a number of cider kits that I’ve been pretty pleased with. They’re easy to make, produce a very nice volume of cider (6 gallons!), and require very little to pull off. I’ve made the Apple and the Pear kits for sampling at the Carrboro location and both have been big hits. However, I wanted to find a way to play around with them and make them a little more exciting. I have long been intrigued by the idea of making a hopped cider and have read about this being an upcoming trend in cider making. I’ve had a few commercial examples.and haven’t quite come across one that I really enjoy. So, I thought I’d give it a try with one of the Brewer’s Best Apple Cider Kits.
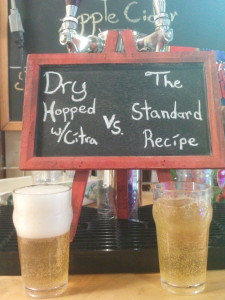
The concept was simple: make and ferment 6 gallons of cider per the directions, keg 3 gallons after fermentation, and then dry-hop the remaining 3 gallons. This split-batch approach allows me to serve samples of both the dry-hopped and unadulterated cider side-by-side so that people can really see what impact the hopping had. I decided to keep it simple and go with 1 oz of whole cone Citra hops for 7 days. You may remember Citra from an earlier blog article discussing its origin and flavor profile. The experiment turned out to be a grand success and the Citra Hopped Cider is a real treat. It was so good that I decided to share the idea and process with any and everyone who may like to try it on their own.
What you need
The beauty of the cider kits is that they require very little time, energy, and equipment to execute. The entire six gallon batch can be prepared for fermentation in approximately 15 to 20 minutes and requires only a few odds and ends to ferment and bottle. Those of you who have been fermenting beer or wine will already have the requisite materials for this process. The rest of you can find what you need at your local Fifth Season Gardening Company or on our webstore,
- Brewer’s Best Apple Cider Kit– This is the center of your recipe and will contain most of the ingredients and the entirety of the instructions for the primary fermentation.
- 6.5 gallon fermentor– Most people will end up using a brewing bucket or carboy to cover this base. However, the 7.9 gallon Speidel would also be a very nice option here. You’ll also need an airlock (and bung for the carboy) to seal off your fermentor.
- 3 gallon fermentor (optional)- You’ll only need this if you want to split the batch as well. I used a 3 gallon glass carboy.
- Sanitizer– Having a good sanitizer on hand is critical for ensuring that there are no contaminations when you’re preparing your must (unfermented cider). I recommend using Star San but there is also IO Star, Star San is easier to use and has the added benefit of foaming to increase the sanitizer’s ability to cover surface area while minimizing the amount of solution needed to accomplish that.
- Minimum 8 quart pot– You’ll need a small pot to heat the water for the sugar mix and I wouldn’t go with anything smaller than 8 quarts (2 gallons).
- Auto-Siphon– This has proven to be an indispensible piece of brewing equipment. The auto-siphon not only makes any racking or transferring very quick and easy, it also doubles as a thief for taking samples during fermentation. Simply remove the inner tube and it’s good to go.
- Spoon/Paddle– This is what you’ll do your stirrin’ with. If you don’t have a plastic or metal spoon/paddle on hand then we’ve got a wide selection to choose from.
- Thermometer– It’s good to have a thermometer on hand just so that you can ensure that you’re pitching your yeast at the appropriate temperature.
- Corn Sugar– The kits call for an additional 2 lbs of corn sugar in order to bring the original gravity of the cider up.
What you’ll need to do
This part is very simple. The cider kit will come with a complete set of instructions for making and fermenting your batch of cider. All you have to do is follow those instructions through the fermentation phase and then dry-hop the cider after 14 days in the primary fermentor. You will want to add 2 oz of your desired hop for to the full 6 gallon batch and leave it for 7 days. Then bottle the cider per the kit’s instructions. If you decide that you want to bottle your batch then you’ll need a bottling bucket, spigot, bottling wand, corn sugar, and some bottles/caps. There’s also the kegging option.
What you can expect
The dry-hopped cider has a very very nice aromatic profile from the Citra and includes notes of pink grapefruit juice, citrus rind, and apple skins. There’s also a noticeable difference in the head retention between the two. The oils from the hops aid in head retention, and that definitely shows in the pour. (Fig. 1)
All in all, this was definitely the easiest split-batch that I’ve done and probably one of the most rewarding. There are certainly times when you wish you hadn’t taken 3 gallons of perfectly good beverage and turned it into an abomination by tossing some ill-advised ingredient into it….but this wasn’t one of them. I was very pleased with the results and will definitely be replicating them for personal consumption!

Leave a Reply