-Naomi Austin-
I started working at Fifth Season almost two years ago. I was hired because I love plants and am easy to talk to. Was I a super-experienced gardener? No, but I had basic gardening experience and wanted to learn (and HAVE learned) so much, by talking to customers and colleagues, and from my own experiences with plants at the store and at home. Now I am confident in my understanding of most plants’ basic needs, including common garden plants and houseplants in the home. One area I really felt like I needed to develop more expertise in, however, was hydroponic gardening.
As a single mother of two young kids who also works full-time, I have a full plate; however, I was really tired of feeling like I couldn’t offer any assistance to customers that came in for Hydroponic advice or products. Plus, we had a HORRIFIC growing season this year here in the Piedmont of North Carolina, so I was jonesing for some greens. Additionally, I have been becoming increasingly disgusted by the waste produced from plastic clam shells and plastic bags for organic greens, especially because I know greens are SUPER FAST and EASY to grow! I decided it was time to face my fears and try to run a SIMPLE AS POSSIBLE hydro setup to grow some lettuce. So, here is my little journey. I hope I can inspire you to get started as well!
WHAT I USED
THE BIN
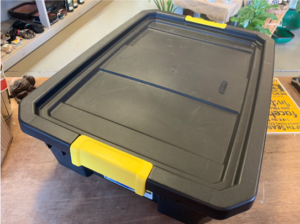
The hardest part was finding a bin for the water. I searched everywhere online but couldn’t tell from the photos what was right for me. I ended up picking up a short but wide 10 gallon Sterilite black storage bin which was made of food grade plastic (check the number on the bottom of the bin and click here for further details). The handle had tiny holes where the locking mechanisms attached, but I just filled them with 100% silicone caulking to make sure the bubblers didn’t cause leakage on my hardwood floors. It worked, and I was still able to keep the handles on and locked, so that my younger child (who is three) didn’t try peeping and playing in the water at home!
THE PUMP
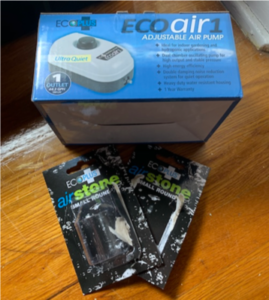
I used the EcoPlus Air 1, which we carry here in the shop of course. This is the most basic pump that we carry, but all that is needed for this setup. It sits beside the bin and pumps air into the water through tubing and air stones for aeration of the roots. I chose to use aeration because it produces fuller and happier plants than the Kratky method (which I learned about during my research on how to best do a home setup).
AIR STONES, TUBING, & T-CONNECTOR
I used two small air stones, and 4 feet of quarter-inch black tubing (both available at Fifth Season) connected in thirds with a T-connector and then to the air pump. The air stones make tiny little bubbles that help bring oxygen into the water. This oxygenation is important to support root growth and to prevent the growth of algae and bacteria, which can deprive roots of nutrients.
THE LIGHT
At first, I was going to use a couple of 2-foot T5 fluorescent grow bulbs, but was told that while those lights would be fine for seedlings and small baby plants, they would not produce enough light for full-grown lettuce. So I went with a 125W Compact Fluorescent (CFL) – Blue (grow) Spectrum bulb and a compact fluorescent reflector.
2” NET CUPS
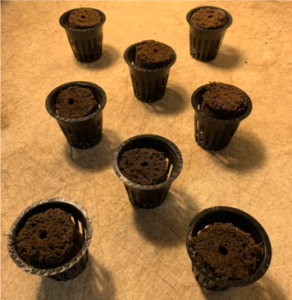
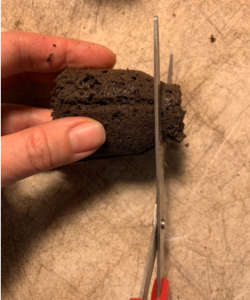
These 2-inch net cups held my seedlings, which I started in cellulose grow plugs.
I drilled 8 holes into the lid of the bin using a 2” hole saw attachment (cheap and easy to use), and set the net cups into the holes.
THE TIMER
I used an Apollo timer to automate my system so it turns on and off automatically, for maximized growth and efficiency. It’s super basic. Nothing special, but totally effective. Plug it in, and set the pins to the desired time you want a flow of power.
THE NUTRIENTS
I mainly used Dyna-Gro: GROW and a small amount of General Hydroponics: Floralicious” for this project. I added nutrients on December 21, and again on January 8th (along with another gallon of lukewarm tap water).
THE SEEDS and STARTER PLUGS
I learned that fresh seeds are best. At first attempt, I used some leftover 2017 seeds for two of the lettuce varieties and 2018 seeds for the third because we had lots of spare seeds in the store to use for in-house projects. None of the 2017 (two year old) seeds came up. Wasted time. Some of the 2018 seeds did come up, but they seemed weaker. Once they started growing, they turned out fine, but overall, I would say the fresh seeds produced stronger plants right out of the gate.
I went with starter plugs instead of rockwool (another popular hydroponic growing medium) because the plugs have mycorrhizae in them, and frankly, I had used them before with great results. Why mess up a sure thing? We sell grow plugs in small amounts too, (starting at a 10 count bag for $4.49), which was cheaper than the rockwool plugs, which had way more than I needed in the smallest package. PLUS, we also had spare grow plugs laying around, but no spare rockwool plugs. The decision was a no-brainer.
I put the seeds into the plugs, cut off the bottoms of the plugs, and tore them into pieces, which I tucked into the sides of the net pots to make sure no light got into the water bin when the net cops were sitting in the system. It’s important to keep light out of the water, because light encourages algae growth, even with moving aerated water. The fewer chances you give the water to grow anything unintended in it, the better success you will have.
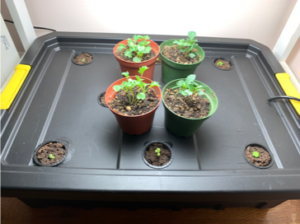
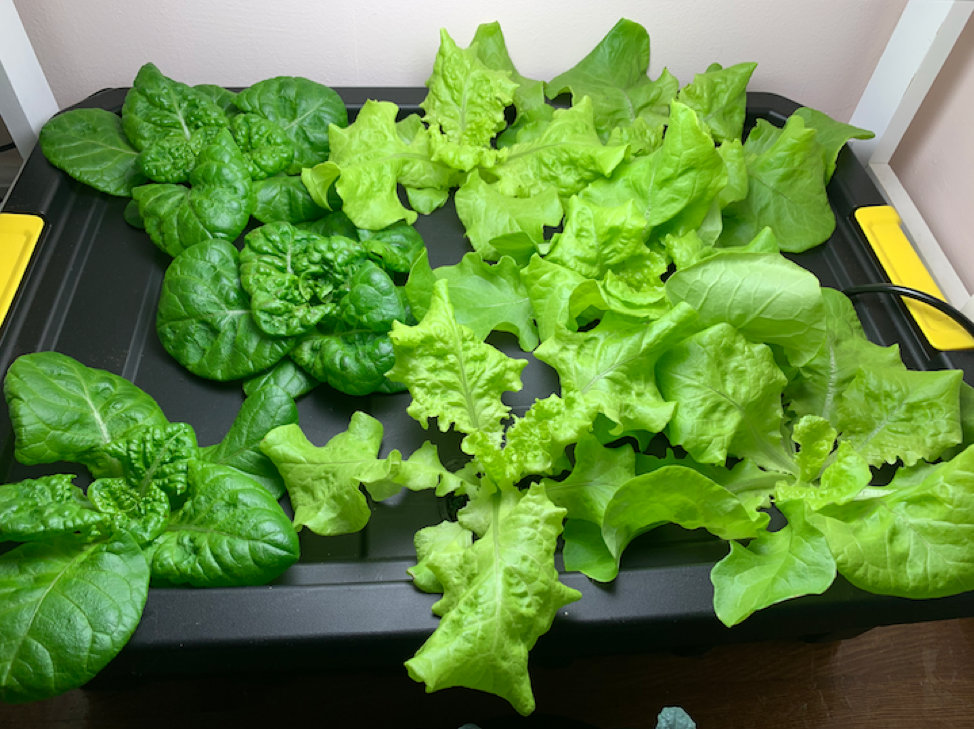
It took about two weeks of the plugs sitting under grow lights for the seedlings to come up and grow roots through the plug medium. As you can see in the photos, I also decided to start two different varieties of kale in soil, to kind of do a side by side comparison. The kale came up super quick and started growing happily, but shortly ran out of nutrients and just kind of sat there once they got 3 inches tall. So, while the hydro lettuce took longer getting started, it ended up blowing the kale out of the water, so to speak. 😉
THE SETUP
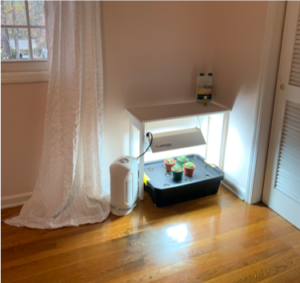
I put this setup in my bedroom in a corner I wasn’t using. I used a little table I didn’t need anymore to mount the light with 2 cup hooks and put the bin underneath that. A shelf would work perfectly fine as well, but since I had that table, I just used that rather than putting more holes in the wall. I also used a little fan which I also already had to blow air on the lettuce to keep the air moving and the heat down, although the lamp really didn’t produce much heat at all. I then put a surge protector next to the table and plugged everything in. Voila! Easy peasy.
THE GROWING PROCESS
THE TRANSFER
On December 8, 2 weeks after planting, when the seedlings were ready, I simply filled the bin with about 8 gallons of city tap water from my bathtub faucet, put the lid pack on, and put the net pots with the seedlings in the holes of the lid. I didn’t want to add the nutrients until the plants matured a little more, as that can burn the plant roots. So, I just went with tap water. I put the light on the timer that I set for 13 hours on and 11 hours off.
THE WAIT
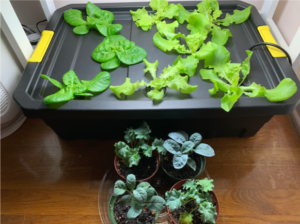
So, I waited… and waited… and those little suckers just sat there, hardly growing, for two weeks. Finally, on December 21, my patience ran out and I decided “may as well” and added some Floralicious and Dyna-gro GROW to the water. POW! Within days, those seedlings finally started to grow! Within one week, they had tripled in size. I kid you not, within a WEEK AND A HALF of adding those nutrients, on New Year’s Day, I was ready to harvest my greens! The leaves ran out of room! By January 10th I had harvested leaves on three separate occasions, to keep the plants from bumping into each other too much and rotting!
I have no complaints, and neither do my two children. Yeah, you read that right. My 3 year old was literally shoving fistfulls of this lettuce into her mouth. Not a fancy salad, either, just lettuce with a little bit of dressing and a couple of croutons. My 7 year old son (who hates salad, because he is 7 and prefers to be picky about everything he eats) also ate his salad without complaint (once he started chewing). The lettuce is buttery, soft, and not bitter AT ALL. It’s FLAVORFUL, too! It has a wonderful texture you simply cannot buy at a grocery store, because it would perish too quickly on the shelves. It’s a true delight to eat this stuff. I harvested a huge batch of leaves this morning before work and plan to eat ALL of it for dinner tonight, knowing in about 3-4 days, I will have just as much again to eat.
Lettuce is one of the hardest things to grow here in NC because the weather tends to get too hot too quickly. So unless I have the perfect spot, I usually only get a month or two of grow- time out of them in my tiny garden. NOT ANYMORE. I’ve found my solution! The hardest part will be the wait in between batches (waiting for seedlings). I may even invest in a simple seedling setup so that I have no big lag time in between rounds of lettuce once this batch is done producing and finally does become bitter or succumbs to root rot.
WHAT I LEARNED
A hydro setup can be simple, easy, take up very little space, and still be super successful. There is an initial investment, but compared to the plants you will lose to bugs, nutrient deficiencies, severe weather, animals, and disease, and the money you will spend on products trying to control those things and the soil, starts, seeds, and nutrients you would also buy, not to mention the money you would spend (mainly on plastic packaging) to buy inferior produce at the grocery store, hydro is a better investment for things like lettuce, kale, swiss chard, basil, mint, and other leafy greens and herbs.
I knew hardly anything about growing hydro when I started this project, and I did it successfully. That means you can too! DO IT! Feed your family and yourself spring delicacies YEAR-AROUND, save money, and enjoy the process of watching your green lovelies grow without the hassle of the common aforementioned issues.

Ma. Evangeline E. Cristi says
Happy to know that you’ve started your hydroponic gardening. Mine, I just started yesterday, but it’s outdoor.. During this pandemic, I kept myself busy doing gardening. I’m praying that this project (hydroponic) will succeed.. So I will be able to bring more freshly produce on our table. Congratulations and morw fresh veggies to come.. God bless.
Quanesha West says
Hello. Thank you for your time in writing this.. I still have a few more questions I would like to ask you specifically. Can you please message or text me so I can get my set up started? Thank you!!
ashley says
Hi Quanesha, we recommend the you call our store closest to where you live, and we can talk with you over the phone and answer questions you may have about your particular set-up.
RoseLee says
I really enjoyed your article and I’m planning on starting a hydroponic garden.
The local grocery stores have lovely displays of veggies that rarely sell out because of the very high prices.
Thanks so much for all the info
Arthur says
Glad to hear you have been successful. I’m planning to start a small hydro farm soon and want to grow tomatoes as a starter. I hope this works out. Years ago I grew hydroponic lettuce, radish and tomatoes. The lettice grew well so did the radish, but the lettice didn’t heart which was to me a bit of a flop. The tomatoes were great. One tomato feeding the whole family. They were a great success. I suggest you give them a go. Another easy peasy crop.
Best of luck and keep at it, the rewards are great.
Diane says
This is great! I’m going to try it. Unless I missed it, I didn’t see any mention of watering the seed plugs. Don’t they need watering to sprout?
ashley says
Hi Diane, If you choose to sprout the seeds outside of this system, say in a flat tray for transplanting, then, yes, they will need to be watered and kept moist. If you sprout them in this system, they should be drawing water from the reservoir that the net cups are set into. Sorry it wasn’t clear that the tub/reservoir was filled with water from the start.
Karen Pac says
Hi! Thank you for all of this valuable information! I am curious about one thing (for now one thing anyway, ha!) It looks as though the seed nets are like little pots, yes? and they fit into the 2″ holes? If that is true, the picture of the set up looks like the pots are sitting on top of the holes instead of in them. Do they sit in the hole so its kind of flush with the top of the bin cover? (at least in the beginning stages?) – thanks in advance!
ashley says
Hi Karen, Those four pots on top of the system in that one photo are actually the pots Naomi filled with soil for her control group, but I can see how that’s confusing! If you look at the close-ups of the plants growing in the hydro system you’ll see the net cups are flush with the top. And yes, the net cups/pots are little plastic pots that are not solid, more like plastic grids that let air and water flow through.
Said says
Thank you very much for sharing this great ideas and your valuable time. I wish if would list the items with their names and where we would order online. May the Almighty bless and protect you and your family.
A Million thanks again
ashley says
Our links should be active now for the products mentioned in this post. We changed our webstore hosting service and it made previous blog post links unavailable. Thanks!
Liz says
Great article and very informative! Can you tell me how much water you fill the bin with?
ashley says
Hi Liz, For this bin, it took about 8 gallons of water. You just want the roots growing through the cups to be down in the aerated water, so the bin will need to be pretty full. Good luck with your system!
Syed says
Hydrophobic farm products are dangerous to health and grown on 100% chemical synthetic fertilisers and synthetic additives without natural mineral mineral soil.
After 10 when millions suffer with cancer and generic diseases, science will prove.
World is going towards natural organic grown with mineral rich soil…..
Jim P says
Thank for sharing your adventure into Hydroponics. I’m in for a DIY Hydroponics project this year. I’ve been container gardening with 18gal Rubbermaid bins the last few years. This will be my next step in gardening. jp
Patricia Sanders says
What a great job describing your setup and your experience!!! I’ve read so many of these “testimony tutorials” and seldom do I ever read it word for word. Yours was concise and to the point with just enough details and personal antic dotes to make the post informational, instructive and enjoyable. Thank you for that!!! Looking to get started ASAP!
ashley says
So glad you found the article helpful, and best of luck with your indoor garden!!!
Lynn says
How can you tell how much water is in the tub if you can’t see in. I know there will be evaporation. Don’t want the roots getting dry.
ashley says
Hi Lynn, This bin has locking handles on the top, but they can be unlocked so you can just lift up the top and check the water level from time to time. Sorry that wasn’t clear!
Terence Wahrman says
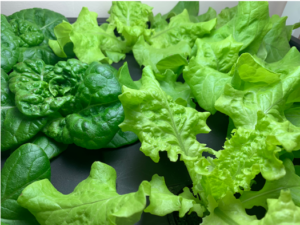
what kind of lettuce did you use that you said your kid was shoving fist fulls into her mouth
ashley says
Hi Terence, I’m not sure what Naomi planted, but that looks like 2 different varieties of leaf lettuce to me – I’m guessing Black Seeded Simpson on the right. Not sure which one on the left. Simpson is mild flavored and not bitter, so great for kids! Sorry we can’t be more exact at this point 🙁
Denisa says
What an awesome guide on setting up your own small hydroponic system indoors, without spending too much money! I absolutely love this kind of guide that lets everyone know that they can do it, too, even if they have no experience with hydroponics or with building things. I love this DWC hydroponic system and people should be aware that they can grow herbs, leafy greens, and even strawberries in those 2-inch net cups. And even tomatoes and cucumbers and peppers if they build it with 3-inch or 4-inch net cups, spaced out a bit more to allow bigger plants to grow.
Jenn says
I have a few questions. How did you connect the air pump to your bin? When you fill the bin with water, how much of the plants pot is under water?
brian says
Great questions. The air pump needs to be outside of the bin and the air stones in the water. For the hoses, simply drill a hole or cut away part of the bin’s top so that you can thread them through. A notch in the side of the lid works well so that the lid can be removed and the hoses stay in place. As for water level, only the bottom 1/2 inch of the net pot needs to be in the water. Moisture will wick up to keep everything moist. Swimming can drown your plants. As the plants grow and they send roots down into the bin, the water level can be allowed to fall as long as the roots still have access to water. In the beginning, the water level won’t fall very quickly as the lid minimizes evaporation and the plants themselves aren’t consuming much. As the plants mature, you will notice that the water level drops much more quickly and that the air around your growing system is more humid. That’s a good sign that everything is working! Just keep an eye on everything and you should have a lot of success. Good luck!
Len says
Does the air pump run on the timer or is it running all the time
brian says
Great question. The air pump is 24/7. Thanks!